Orders

A review of the list of all orders made in the online store can be found at: Orders > Overview.
This overview displays basic information about the orders. By selecting the column header, the list can be sorted in ascending or descending order based on the chosen column.
To make additional settings to an order and/or to edit it, you can use the "..." button on the order row and choose "View" from the context menu, or click on the order number.
1. Order View
A page with detailed information about the order opens.
In the "General" section, you will find the most important information about the order.
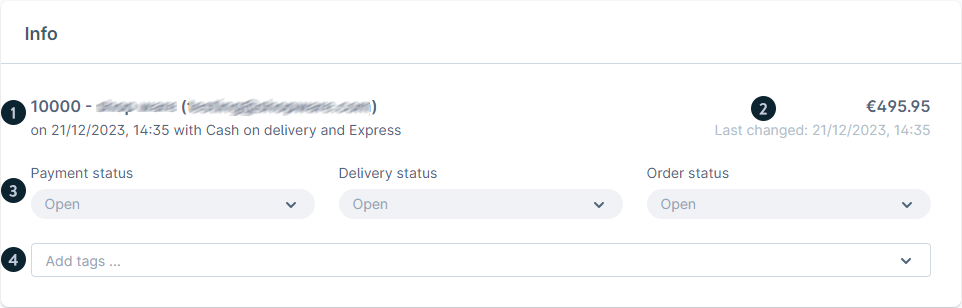
In the "Info" section, the most crucial details about the order are available, including current payments, deliveries, and the order status. If necessary, the order can be canceled from there.
In the "Items" section, complete information about all products that are part of the order is available.
2. Details

In the "Details" section, complete information is available regarding the order statuses, billing details, and delivery addresses.
3. Change the Order Status
From the dropdown menus available in both the "General" and "Details" sections, you can change the statuses of the order. You can modify both the primary order status as well as the payment or delivery status details.

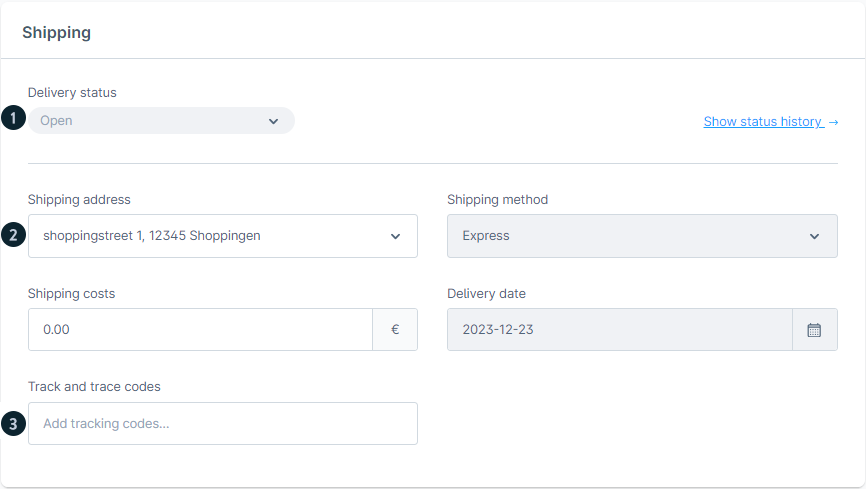
Order status (1): Here, you can see the current delivery status of the order. If there have already been changes to the history, you can display the complete history via the "Show status history" link.
Some statuses are interdependent and can only be selected if the order already has a certain status.
The order status can only be set to Completed if the status has already been set to In progress. To change it back to Open, the order status must first be set to Completed or Canceled.
Order details (2): The customer's e-mail address and telephone number are displayed here, as well as the sales channel through which the order came in and the order language. You can subsequently change the e-mail address and telephone number. All status mails will then use the new e-mail address for the delivery of e-mails. The default e-mail address of the customer account will not be changed.
Affiliate code and campaign code (3): If the customer has ordered something via an affiliate code or campaign code, these are displayed here. These can also be changed at a later date.
Additional information (4): If the customer has left a comment on the checkout page, this is displayed here and can be changed.
Discount promotions (5): Any discount promotions used for this order are displayed here.
Deactivate automatically added promotions (6): This setting prevents promotions from being automatically added to the order when creating or editing an order. These can be currently active discounts, for example.
When a new status is selected from the list, a modal window opens where you can choose whether to send information to the customer via email. If the checkbox is "enabled," when you press the "Update Status" button, the order status will change in the admin panel of the online store, and the customer will receive an email with information about the status change of the order.
The link "Show status history" opens a list with detailed information about all the statuses through which the order has passed.
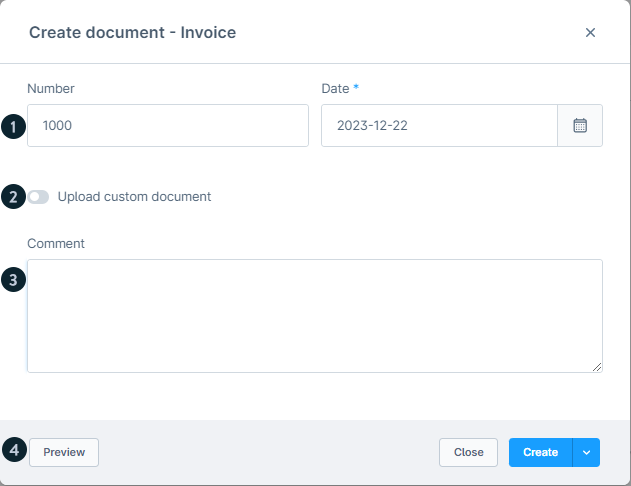
After you have clicked on Create New you can select which type of document you want to create for this order. To create the document you have to make the following settings:
Number and date (1): Enter here the number of the document and the date, which should be entered on the document. This information is necessary if you create the documents. By default, the next number from the respective number range is selected as the number.
Upload custom document (2): If you don't want to create the documents like invoices or delivery bills with the shop but the documents are already available as PDF, activate this option. In a further step you have the possibility to upload this PDF. In this case, the input number and date will not be reproduced on the document.
Comment (3): The comment is noted in the standard at the bottom of the document.
Preview (4): With this button you can see in the browser how the document created by the shop would look like. Own documents are not considered here.
